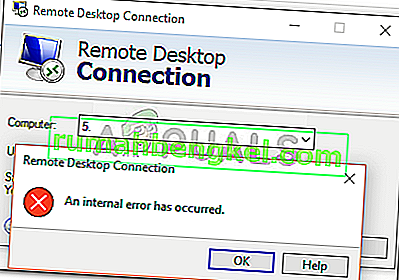
0xc000000e השגיאה כאשר מנסים לאתחל את חלונות אמצעים כי אתה מתעסק פגום תצורת אתחול נתונים. נתוני תצורת האתחול הם חנות גלובלית לכל האפשרויות וההגדרות הקשורות לאתחול במחשבי Windows חדשים יותר.
תקבל שגיאה זו כאשר אתה מנסה לאתחל את המכשיר שלך, ויוצג בפניך מסך שחור המספק הוראות כיצד לתקן את המחשב באמצעות דיסק התקנה או כונן שחזור. למרבה הצער, כונן התאוששות זה הוא הדרך היחידה שתפתור בעיה זו, לכן עליך לשים יד על אחת לפני שתתחיל. אם אין לך את זה, זה די קל ליצור אחד באמצעות כלי Rufus או Windows Media Creation מכל מחשב אחר או מחשב נייד.

יהיה עליך גם לאתחל ל- BIOS שלך כדי לשנות את סדר האתחול ולהפוך את המחשב לאתחול מכונן השחזור במקום מהכונן הקשיח. לשם כך, השתמש בשלבים הבאים:
- הזן את הגדרות ה- BIOS או ה- UEFI על ידי לחיצה על המפתח המיועד של יצרן לוח האם לפני אתחול Windows. מפתח זה הוא בדרך כלל Esc, Delete, F2, F8, F10, F12 או Backspace, תלוי ביצרן. באפשרותך לבצע חיפוש מקוון כיצד להיכנס ל- BIOS, ואחריו דגם המחשב שלך.
- ברגע שנכנס פנימה, נווט אל ה- Boot השתמש בהוראות שנמצאות ב- BIOS כדי לשנות את סדר האתחול שלך, והגדר את התקליטור או את יציאת ה- USB להיות ההתקן הראשון, תלוי אם כונן השחזור שלך הוא CD או כונן הבזק. .
- שמור את ההגדרות שלך ויצא.

שיטה 1: בנה מחדש את נתוני תצורת האתחול
לשם כך יהיה עליך לאתחל את המחשב מכונן השחזור. אם הגדרת את ה- BIOS עם השלבים שלמעלה, תוכל לעשות זאת על ידי לחיצה על מקש כלשהו ברגע שההנחיה מופיעה בתצוגה שלך. לאחר אתחול המחשב מכונן השחזור, השתמש בשלבים הבאים כדי לבנות מחדש את ה- BCD:
- ב ההתקנה של Windows תיבת הדו-שיח, הכל מוכן הערכים המתאימים, לבחור את השפה שלך ולחץ
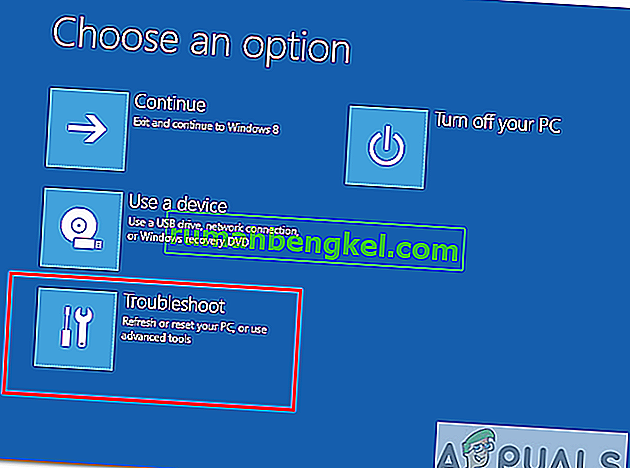
- בפינה השמאלית התחתונה, לחץ על תיקון המחשב שלך ובחר לפתור בעיות מהמסך בחר אפשרות.
- בשנות ה פתרון המסך, לחץ על אפשרויות מתקדמות, ולחץ על Command Prompt.
- כאשר שורת הפקודה נפתחת, הקלד את הפקודות הבאות ולחץ על Enter במקלדת לאחר כל אחת מהן:
bootrec / scanos bootrec / fixmbr bootrec / fixboot bootrec / rebuildbcd
- אתחל את המחשב שלך והוא אמור לאתחל בסדר גמור, מבלי להתמודד שוב עם הבעיה.

שיטה 2: תקן את מערכת ההפעלה שלך באמצעות כונן השחזור
שיטה זו תתקן גם את מערכת ההפעלה שלך באמצעות שורת הפקודה של כונן ההתאוששות, ואתה אמור להיות מסוגל לאתחל ל- Windows מבלי להתמודד שוב עם הבעיה. אתחול מכונן השחזור ופעל לפי ההוראות שלהלן.
- השתמש בשלבים 1 עד 3 מהשיטה הקודמת כדי להגיע לשורת הפקודה של כונן השחזור.
- ברגע שנמצא בתוך שורת הפקודה, הקלד את הפקודות למטה, ואחריו Enter במקלדת כדי לבצע אותן. StartRep.exe השירות מתקן ערכי סביבת אתחול וצריך לתקן את שגיאת BCD. שים לב, ייתכן שיהיה עליך לחזור על שלב זה מספר פעמים במקרה שהוא נכשל.
cd x: \ sources \ recovery StartRep.exe
- אם השלב הקודם של תיקון Windows לא עזר, הקלד bcdedit בשורת הפקודה כדי לראות את הערכים עבור מנהל האתחול של Windows.
- שים לב לערכים עבור התקן . אם הם לא ידועים , הקלד את הפקודות הבאות, כל אחת ואחריה Enter כדי לבצע אותן. שים לב שעליך להחליף את C: במחיצה בה מותקנת מערכת ההפעלה שלך, במידת הצורך.
bcdedit / set {DEFAULT.EN_US} מחיצת מכשיר = c: bcdedit / set {DEFAULT.EN_US} מחיצת osdevice = c: bcdedit / set {BOOTMGR.EN_US} מחיצת מכשיר = c:- לאחר שורת הפקודה, סגור אותה, הסר את כונן השחזור והפעל מחדש את המערכת שלך. זה לא אמור להיות שום בעיות אתחול עכשיו.
החיסרון היחיד בפתרונות אלה הוא שהם דורשים כונן התאוששות, סבלנות ועצבים חזקים. עם זאת, אם אתה עוקב אחריהם כפי שמתואר, עליך לתקן את השגיאה שקיבלת ולהמשיך להשתמש במכשיר שלך כמו בעבר.
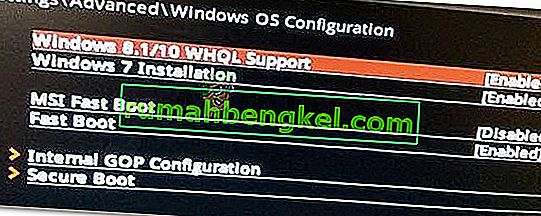
שיטה 3: אפשר תמיכה ב- Windows 10 WHQL ב- BIOS
הגדרת התמיכה של Windows 10 WHQL קיימת בחלק ממוצרי ה- OEM. יש לו שתי פונקציות בסיסיות: בדיקת דרייברים חתומים במהלך תהליך האתחול ומאפשרת לך להפעיל תמיכה ב- UEFI. אם אתה משתמש ב- Windows 10, עליך להפעיל אותו ואז המחשב שלך יכול לאתחל כרגיל. עם זאת, אם היא לא נבחרה, המחשב שלך עשוי לאתחל לשגיאה 0xc000000e. אז אתה יכול לגשת ל- BIOS כדי לראות אם הגדרת התמיכה של Windows 10 WHQL מופעלת. אם לא, אפשר לו לנסות.
עליך לציין כי הגדרת התמיכה של Windows 10 WHQL אינה נתמכת בכל המחשבים. אם למחשב שלך אין את זה, אתה יכול לבדוק אם תמיכת UEFI מופעלת במחשב שלך. אם לא, תוכל לאפשר זאת כדי לראות אם קוד השגיאה 0xc000000e נעלם. על מנת לאפשר זאת:
- כבה את המחשב לחלוטין והניח לו לשבת במשך כמה דקות לפחות.
- לאחר שווידאת שחלף זמן מספק, הפעל את גיבוי המחשב ועליך לשים לב לאפשרות " לחץ על כפתור זה כדי לאתחל למצב Bios ".
- לחץ על הלחצן כדי לאתחל למצב Bios.
- לאחר אתחול בהצלחה במצב ה- Bios, בדוק אם קיימת הגדרת WHQL של Windows ב- Bios.
- אם הוא קיים, לחץ על "Enter" כדי לבחור בו לאחר הדגשתו באמצעות מקשי החצים, ובחר באפשרות "מופעלת" כדי להפעיל אותו במחשב שלך.
- בדוק אם זה פותר את הבעיה.

אם שגיאת האתחול של Windows 10 0xc000000e עדיין מופיעה לאחר הפעלת הגדרת התמיכה של WHQL של Windows 10 או תמיכה ב- UEFI, ייתכן שתצטרך לאפס את תצורת ה- BIOS / UEFI במחשב שלך.
שיטה 4: לבנות מחדש BCD באמצעות Essentials Easy Recovery
Easy Recovery Essentials היא תכונה אוטומטית של תיקון מערכת בלחיצה אחת המשלבת תיקון ושחזור מלא של ה- BCD בכדי לפתור את השגיאה "0xc000000e", גם במקרים שבהם Windows לא יאתחל כתוצאה מהשגיאה.
הרכיב האוטומטי לתיקון אתחול של EasyRE יטפל בכל הבעיות הקשורות ל- BCD, תיקון ה- BCD או יצירתו מחדש מאפס באמצעות הקידוד והנתיב הנכונים עבור המחיצה המסרבת לטעון כראוי. זה גם יסמן את הדיסק כמקוון כדי להבטיח שהוא פועל כהלכה.
Easy Recovery Essentials מובטח לתקן את השגיאה "0xc000000e" באופן אוטומטי באמצעות אפשרות התיקון האוטומטית המובנית שלה. EasyRE זמין כעת עבור Windows XP, Vista, 7, 8, 10 וניתן להוריד אותו וליצור אותו בכל מחשב.
- שלח מחשב אחר שתוכל להשתמש בו ליצירת USB שבו נשתמש כדי לאתחל את המחשב.
- הורד את יסודות השחזור הקלים מכאן.
- צרוב את התמונה.
- אתחל את המחשב מהתקליטור Easy Recovery Essentials או USB שיצרת.
- לאחר הפעלת EasyRE, בחר באפשרות "תיקון אוטומטי" ולחץ על המשך.
- לאחר ש- EasyRE סורק את כונני המחשב, זהה ובחר את אות הכונן להתקנת Windows שלך מהרשימה, ואז לחץ על אפשרות התיקון האוטומטית כדי להתחיל.
- Essentials Recovery Easy יתחילו לנתח את הכונן שנבחר לבעיות. EasyRE תבדוק וינסה לתקן שגיאות באופן אוטומטי עם הדיסק, המחיצה, מגף המגף, מערכת הקבצים, האתחול והרישום. אין צורך בהתערבות מכיוון שהתיקון של EasyRE הוא אוטומטי לחלוטין.
- לאחר סיום התהליך, EasyRE ידווח על ממצאיו. לחץ על כפתור הפעלה מחדש כדי לאתחל את המחשב ולבדוק את השינויים.

שיטה 5: אפס את תצורת ה- BIOS / UEFI
חלק מהמשתמשים אמרו כי בעיית השגיאה 0xc000000e נפתרת על ידי איפוס תצורת ה- BIOS / UEFI. אז אתה יכול לשקול לנסות בשיטה זו כדי לראות אם ניתן לפתור בעיה זו.
שלב 1. פתח את תפריט ה- BIOS
כדי לאפס את ה- BIOS להגדרות ברירת המחדל, עליך לגשת לתפריט ה- BIOS ולמצוא תחילה את אפשרות הגדרות ברירת המחדל.
משתמשי Windows 10 יכולים לגשת לאפשרויות הפעלה מתקדמות Windows 10 ולהיכנס לתפריט ה- BIOS. אתה יכול ללחוץ על התחל -> הפעלה, ללחוץ לחיצה ארוכה על מקש Shift וללחוץ על כפתור הפעלה מחדש כדי להפעיל מחדש את Windows לסביבת השחזור של Windows. לאחר מכן לחץ על פתרון בעיות -> אפשרויות מתקדמות -> הגדרות קושחת UEFI ולחץ על הפעל מחדש כדי להיכנס למסך הגדרות ה- BIOS.
לחלופין, תוכל גם להפעיל מחדש את המחשב כרגיל וללחוץ על המקש הנדרש במסך האתחול כדי לאתחל לחלון הגדרות ה- BIOS. מקש הקיצור מגוון מיצרני מחשבים שונים והוא יכול להיות F12, Del, Esc, F8, F2 וכו '.
שלב 2. מצא את אפשרות ברירת המחדל של ההתקנה
השם והמיקום של האפשרות "הגדרות ברירת מחדל להתקנה" עשויים להיות שונים ממחשבים שונים. זה בדרך כלל קורא כמו: לטעון ברירת מחדל, לטעון ברירות מחדל להתקנה, לטעון הגדרות ברירת מחדל, לטעון ברירות מחדל של BIOS, לטעון ברירות מחדל אופטימליות וכו '.
השתמש במקשי החצים במקלדת המחשב כדי למצוא את אפשרות ברירת המחדל של הגדרת ה- BIOS במסך הגדרות ה- BIOS. ייתכן שתמצא אותו באחת מכרטיסיות ה- BIOS.
שלב 3. אפס את ה- BIOS
After you find the Load Setup Defaults option, you can select it and press the Enter button to start resetting the BIOS to factory default settings in Windows 10.
At last, you can press F10 to save and exit BIOS. Your computer will automatically reboot. If you need to change BIOS settings again in the future, you can follow the same instructions to access BIOS again to change it.
Method 6: Mark Boot Disk As Online
It is possible in some cases, that the disk that you have connected to the computer or the USB that you are trying to boot from has been marked as offline by the computer. Some computers tend to prevent extra applications, hardware, and other things from being able to run as soon as the computer starts because it allows for more convenient and fast startup experience. Therefore, in this step, we will be marking the Disk as online.
You still need to use a bootable USB medium to do this job. We will show you a step-by-step guide here:
- After booting your computer from the bootable USB drive, you need to go to Next > Repair your computer. Then, you will enter WinRE.
- Go to Troubleshoot > Advanced options > Command Prompt.

- Make sure to properly enter your login credentials if you are asked by the computer.
- Type in the following command inside the command prompt to successfully launch the disk part utility on your computer.
diskpart
- Type in either one of the following commands in the next window to list the currently connected disk drives to your computer.
List Disk List Volume
- Once the disks have been listed, you need to identify the disk that contains the Windows operating system and the one that you want to mark as active.
- After identifying it, select the disk using the following command and replacing the alphabet with the driver letter of that disk.
select disk A Select Volume A (Replace A with the Drive Letter)
- After you have successfully selected the disk, you must mark the disk as online in order to initiate the recognization process of the disk at startup. Use the following commands to do that.
Online Disk Online Volume
- Type in the following command to successfully get out of the command prompt and restart your computer after that.
Exit
- Check to see if marking the Disk as online has fixed your issue.

Method 7: Check your data cables, BIOS and drivers
Unplug all HDD data cables, and then plug them again. Revert to the previous drivers and BIOS settings if they were changed, or use “Restore factory settings” option in the BIOS. Make sure to write down all current BIOS settings that were previously selected, just in case it is required to switch back. If the error is caused by a change of the SATA disk controller’s mode in the BIOS or firmware, the fix can be as simple as entering the BIOS and toggling the SATA controller’s “mode” setting. The exact instructions differ from one manufacturer to the other, but the options will resemble what is shown in the screenshots below.
To check the boot order, follow these steps:
- Restart the computer
- Press the necessary key to open the BIOS menu. This key depends on the computer manufacturer and computer model. This is usually listed on the first screen that appears on the monitor. It can be any of the following: Esc, Del, F2, F8, F10 or F12.
- If the screen shows multiple keys, find the key to open “BIOS”, “setup” or “BIOS menu”
- Attempt to toggle between all three (or more) modes until a combination that results in Windows booting successfully once more is found.
Method 8: Boot Windows In Safe Mode
If above solutions didn’t fix the problem, then Start Windows into safe mode. This will start your PC with minimum system requirements, will not load startup programs, add-ons etc. And allow performing troubleshooting steps to fix Boot Error 0xc000000e:
Before you enter the safe mode, you need to enter the Windows Recovery Environment (winRE). To do this, you will repeatedly turn your device OFF, then ON:
- Hold down the power button for 10 seconds to turn off your device.
- Press the power button again to turn on your device.
- On the first sign that Windows has started (for example, some devices show the manufacturer’s logo when restarting) hold down the power button for 10 seconds to turn off your device.
- Press the power button again to turn on your device.
- When Windows restarts, hold down the power button for 10 seconds to turn off your device.
- Press the power button again to turn on your device.
- Allow your device to fully restart and you should boot into the Windows Recovery Environment.
Now that you are in the Windows Recovery Environment, you will follow these steps to take you to safe mode:
- On the Choose an option, screen, select “Troubleshoot” and then “Advanced options.”
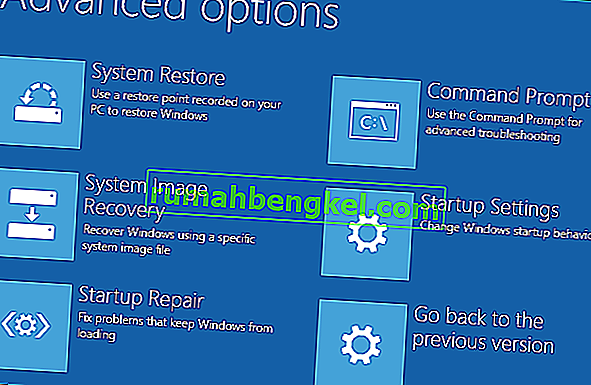
- Now click on “Startup Settings” and click on “Restart.”
- After your device restarts, you’ll see a list of options. Select option “4” from the list or press “F4” to enter Safe Mode.

Note: If you need to exit safe mode, simply restart your device, or:
- Press the “Windows logo key + R.”
- Type “msconfig” in the Run box and then select “OK”.

- Select the Boot tab and under Boot options, clear the Safe boot checkbox.

Method 9: Check your disk with CHKDSK utility
If the hard drive has its file integrity compromised, it is possible to use built-in Windows CHKDSK utility to scan the disk and fix the file system errors.
- Connect a USB drive that has been made bootable or insert the Windows Installation Disk on your computer.
- After connecting one of these, boot from that connected device.
- After booting your computer from the device, click on “Next” and then on the “Repair your Computer” option.
- On the next window, click on “Troubleshoot” and then on the “Advanced” Option.

- On the next screen, make sure to select the “CommandPrompt” option to successfully launch into the command prompt.
- Provide the login credentials of your account in order to boot inside the cmd.
- Inside the command prompt, type in the following command to successfully run the check disk utility on your computer.
chkdsk C: /f (Make sure to replace the "C" with the Drive letter of your partition).
- Confirm any on-screen prompts and wait for the scan to be fully completed.
- Check to see if the issue is fixed by performing this step.
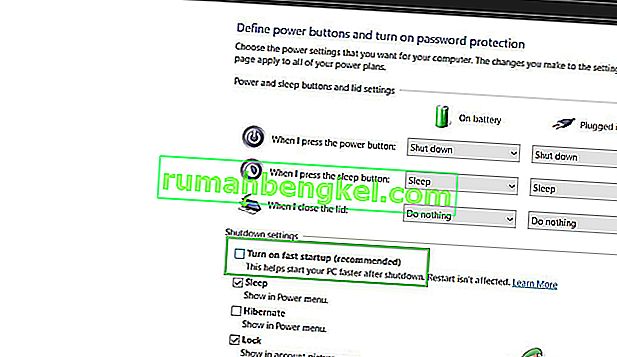
Method 10: Disable fast startup Feature
If your computer has been set up to use the Fast Startup feature, you might be getting this error message on your screen because of doing so. The Fast Startup feature is known to malfunction with some operating systems and hardware combinations.
Basically, when enabled, the feature automatically sends some launch configurations to be stored in your RAM to allow for a faster startup as indicated by its name but this configuration data can sometimes be corrupted which can lead to this error on your computer. Therefore, in this step, we will be disabling it completely. For that:
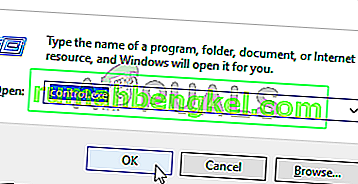
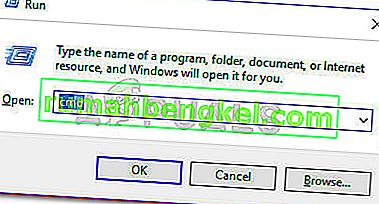
- Press “Windows” + “R” to open the Run prompt.
- Type in “Control Panel” and press “enter” to launch the classical Control Panel interface.
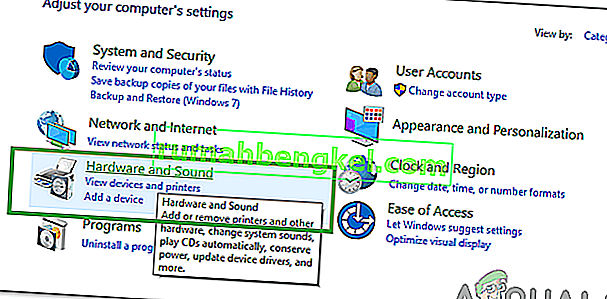
- Inside the control panel, click on the “Hardware and Sound” option and then select the “Power Options” button.
- Inside the power options, click on the “Choose what the power button does” from the left side.
- Click on the “Change Settings” option if the fast startup option is greyed out.
- Make sure to uncheck the “Turn on Fast Startup” option and save your changes.
- Closeout of the window and terminate any unnecessary applications.
- Click on the “Start Menu”, click on the “Power Options” and select “Shutdown” from the list.
- This option should completely power down your computer and after performing a complete shutdown, wait for some minutes before turning your computer back on.
- After the computer turns back on, check to see if the error message is fixed.
Note: This solution can only be applied if you are able to sometimes boot up your computer normally and are only encountering this error momentarily.


Method 11: Repair Corrupted System Files
It also possible in some situations that certain system files might have been corrupted due to a storage failure or due to some other reason. Therefore, in this step, we will be performing a complete repair of the corrupted system files and then we will check to see if doing so fixes this issue. For that:
- Press “Windows” + “R” to open the Run prompt.
- Type in “cmd” and then press “Shift” + “Ctrl” + “Enter” to launch the command prompt with admin privileges.
- Type in the following commands one by one and press “Enter” after each to successfully run an SFC scan and a DISM Scan on your computer.
DISM /Online /Cleanup-Image /RestoreHealth sfc /scannow
- Restart your computer completely once these scans are completed.
- Check to see if by performing these scans, you were able to fix this issue on your computer.

Method 12: Run Windows Startup Repair
Startup Repair is capable of diagnosing and fixing the found issues. For example, it can automatically scan system files, registry settings, configuration settings, etc. and try to fix the problem on its own. Startup Repair is especially useful when your computer is unbootable. Since your computer fails to boot, Windows can boot into WinRE automatically. While, if it doesn’t appear, you can interrupt the boot process three times in a row, and then the WinRE screen appears. Alternatively, if you have a bootable USB medium, you can also set your computer to boot from it and go to Repair your computer to enter WinRE.
After you have successfully booted into the Windows Recovery Environment, click on the “Troubleshoot” option, and from there, select the “Advanced Options” screen. Inside the advanced options, select the “StartupRepair” button to successfully initiate the Startup Repairing process. Windows will begin to diagnose your computer automatically. When the process ends, your computer will restart automatically. You can wait to see whether it can boot successfully.

דרך לעקיפת הבעיה: וודא שאין התקנים נוספים מחוברים לפני שתקפוץ לשורת הפקודה או לתיקון אתחול, עדיף לנסות הפעלה מחדש עם המספר המעט ביותר של התקנים וכוננים חיצוניים המחוברים למחשב. פעולה זו תוודא ששום דבר שהתווסף לאחרונה למחשב אינו גורם לבעיה זו. הכי טוב יהיה לנתק את כונני ה- USB, התקליטורים, ה- DVD וכו 'האחרונים. זה כולל גם קורא כרטיסי זיכרון. ודא שכל הכוננים החיצוניים ומפתחות ה- USB או כונני הקפיצה USB נותקו, ואז נסה שוב.