את " חריג שאינו מטופל Win32 התרחשו * APPLICATION_NAME * 'שגיאה מתרחשת בדרך כלל כאשר ניסיונות למשתמש להפעיל יישום שנבנה ב- Visual Studio. המקרים המדווחים ביותר של שגיאה זו קשורים ל- Uplay, Internet Explorer וכמה משחקי Legacy שנבנו בתחילה עבור גרסאות ישנות יותר של Windows.

הערה : כך ניתן לתקן ספריית Runtime הקשורה ל- Visual C ++.
מה גורם לשגיאת "חריגה שלא טופלה ביישום שלך" ב- Windows?
ישנם מספר גורמים פשוטים לבעיה זו וניתן להתמודד עם הבעיה באופן יעיל אם אתה מסוגל לזהות את התרחיש שלך פשוט על סמך זיהוי הגורם הנכון. עיין ברשימה הבאה:
- האנטי-וירוס שלך עשוי להיות האשם - ידוע שכמה כלי אנטי-וירוס כגון Panda Antivirus גרמו לבעיה זו, לכן וודא שאתה מחליף אותם.
- ייתכן שתוכניות או תוכנות זדוניות מסוימות פועלות - אם תוכנית מותקנת או תוכנה זדונית פועלת במחשב שלך, ייתכן שתרצה להיפטר ממנה. הקפד לאתחל אתחול נקי כדי לראות אם זו הסיבה הנכונה.
- התקנת Microsoft .NET Framework פגומה - אם קבצי הליבה שלה פגומים, אתה יכול לנסות לתקן את ההתקנה שלה, להתקין גרסה חדשה יותר או לבצע סריקת SFC.
- ניפוי באגים בסקריפטים מופעל באמצעות הרישום - כפי שמתברר, מפתח רישום מסוים יכול לתרום להופעתה של בעיה זו. כדי לטפל בזה, תצטרך להשבית איתור באגים בסקריפט באמצעות מפתחות רישום.
- הפרת גישה ב- Msvcr92.dll - חיץ מקור חורג או בייט סופי לא תקין הם גם גורמים פוטנציאליים לבעיה זו. כדי לטפל בהם, יהיה עליך להתקין כל עדכון Windows בהמתנה.
- מחיקת מפתח הרישום של משגר Ubisoft - אם אתה רואה שגיאה זו בעת ניסיון להפעיל את Uplay.exe, זה נובע מבאג עם משגר המשחקים של Ubisoft. ניתן לפתור בעיה זו באמצעות הרישום על ידי מחיקת הערך השייך למפעיל זה.
- שחיתות בקבצי מערכת - חוסר עקביות בקבצי המערכת יכולה ליצור בעיה זו. ניתן לפתור שחיתות קלה באמצעות סריקות DISM ו- SFC פשוטות. בנסיבות קשות יותר, התקנה נקייה או התקנה תיקונים אמורים לעזור לך בפתרון הבעיה.
פתרון 1: התקן כל Windows Update בהמתנה
אחד הגורמים השכיחים שבסופו של דבר יגרום לשגיאה " אירעה חריג win32 לא מטופל 'היא יישום שנבנה עבור פלטפורמת x64 באמצעות MSVCR90.DLL שבסופו של דבר קורא לפונקציה strncpy.
במקרה זה, הפרת גישה המופעלת בקובץ Msvcr92.DLL תגרום ככל הנראה ליישום להפסיק להגיב בפונקציה strncpy. מאגר מקור חורג או בית גמר לא תקין הם הגורמים הסבירים ביותר לבעיה זו.
למרבה המזל, מיקרוסופט כבר מודעת לבעיה זו ושחררה תיקון חם לבעיה זו שתפתור אותה באופן אוטומטי. כדי לנצל את זה, כל שעליך לעשות הוא לעדכן את גרסת מערכת ההפעלה שלך לגרסה האחרונה הזמינה.
הערה: התיקון החם הזה נדחק במסגרת גרסה של Visual Studio 2008, ש- Windows מעדכן אוטומטית, כך שהשלבים שלהלן הם אוניברסליים ועליהם לעבוד ללא קשר לגרסת מערכת ההפעלה שלך.
להלן מדריך מהיר לעדכון ה- Windows build שלך לגרסה האחרונה כדי להתקין את התיקון החם עבור Visual Studio 2008 ולפתור את הבעיה:
- לחץ על מקש Windows + R כדי לפתוח תיבת דו-שיח הפעלה . לאחר מכן הקלד 'הגדרות ms: windowsupdate' ולחץ על Enter כדי לפתוח את כרטיסיית העדכון של Windows באפליקציית ההגדרות .

הערה: במקרה שאתה נתקל בבעיה זו ב- Windows 7 או Windows 8.1. השתמש במקום זאת בפקודה 'wuapp' .
- לאחר שתצליח להגיע למסך Windows Update, התחל בלחיצה על בדוק אם קיימים עדכונים . לאחר מכן התחל לבצע את ההנחיות שעל המסך כדי להשלים את ההתקנה של כל Windows Update שממתין כעת להתקנה.

הערה: יש לזכור שחשוב שתתקין כל עדכון, לא רק העדכני. מכיוון שהתיקון החם נכלל בתיקון של Visual Studio, ייתכן שתמצא את העדכון המדובר תחת אופציונלי, לכן הקפד להתקין את כולם.
- במקרה שתתבקש להפעיל מחדש לפני שתזדמן להתקין כל עדכון זמין, עשה זאת. אך דאגו לחזור לאותו מסך לאחר סיום האתחול הבא על מנת להשלים את התקנת שאר העדכונים.
- לאחר התקנת כל עדכון בהמתנה, הפעל מחדש את המחשב בפעם האחרונה ואז חזור על הפעולה שגרמה בעבר להודעת השגיאה כדי לראות אם הבעיה נפתרה.


במקרה שאתה עדיין נתקל בשגיאת " חריג win32 לא מטופל התרחש ", עבור למטה לשיטה הבאה למטה.
פתרון 2: החלף את האנטי-וירוס שלך
כלי אנטי-וירוס בחינם יכולים להיות מועילים למדי והם יכולים לעשות את עבודתם בהגנה על המחשב שלך, אך לפעמים הם פשוט לא מסתדרים טוב עם דברים אחרים במחשב שלך. שקול להחליף את האנטי-וירוס שלך אם הוא גורם לבעיה זו בזמן שהוא מופעל!
- לחץ על תפריט התחל ופתח את לוח הבקרה על ידי חיפוש אותו. לחלופין, אתה יכול ללחוץ על סמל גלגל השיניים כדי לפתוח את ההגדרות אם אתה משתמש ב- Windows 10.
- בלוח הבקרה, בחרו להציג כ - קטגוריה בפינה השמאלית העליונה ולחצו על הסר התקנת תוכנית בקטע תוכניות.

- אם אתה משתמש באפליקציית ההגדרות, לחיצה על יישומים אמורה לפתוח מיד רשימה של כל התוכניות המותקנות במחשב האישי שלך.
- אתר את כלי האנטי-וירוס שלך בלוח הבקרה או בהגדרות ולחץ על הסר התקנה .
- אשף ההתקנה שלו אמור להיפתח, לכן עקוב אחר ההוראות להסרת ההתקנה.

- לחץ על סיום כאשר מסיר ההתקנה משלים את התהליך והפעל מחדש את המחשב שלך כדי לראות אם עדיין יופיעו שגיאות. הקפד לבחור אפשרות אנטי-וירוס טובה יותר .
פתרון 3: מחיקת ערך הרישום של משגר (אם רלוונטי)
אם אתה נתקל בשגיאת " חריג win32 לא מטופל התרחש " כשאתה מנסה להפעיל את Uplay.exe או יישום אחר השייך ל- Ubisoft, ככל הנראה זה נובע מבאג עם משגר המשחקים של Ubisoft שלהם.
כפי שמתברר, נראה שמדובר בבעיה נרחבת ב- Windows 10, במיוחד בקרב משתמשים שהותקנו בו זמנית Steam ו- Uplay.
כמה משתמשים מושפעים שאנו מתקשים לפתור בעיה זו הצליחו לתקן אותה באמצעות עורך הרישום כדי למצוא את ערך הרישום של מחרוזת השייך למפעיל ולמחוק אותו. זה כביכול מבטל את הסכסוך, ומאפשר לשתי היישומים לתפקד כראוי תחת אותה מכונה.
להלן מדריך מהיר למחיקת ערך הרישום המשויך למשגר ה- Uplay:
- לחץ על מקש Windows + R כדי לפתוח תיבת דו-שיח הפעלה . בתוך תיבת הטקסט, הקלד 'regedit' ולחץ על Enter כדי לפתוח את עורך הרישום . כאשר הנחיית UAC (בקרת חשבון משתמש) מתבקשת, הקלד כן כדי להעניק הרשאות ניהול.

- ברגע שאתה נכנס לעורך הרישום , השתמש בחלק השמאלי של החלון כדי לנווט למיקום הבא:
מחשב \ HKEY_LOCAL_MACHINE \ SOFTWARE \ WOW6432Node \ Ubisoft
הערה: ניתן לנווט לשם באופן ידני או להדביק את המיקום ישירות בסרגל הניווט בחלק העליון ולחץ על Enter כדי להגיע לשם באופן מיידי.
- לאחר שתצליח לנחות במיקום הנכון, עבור למטה לחלק הימני של המסך, לחץ באמצעות לחצן העכבר הימני על Launcher ובחר למחוק כדי להיפטר ממנו.
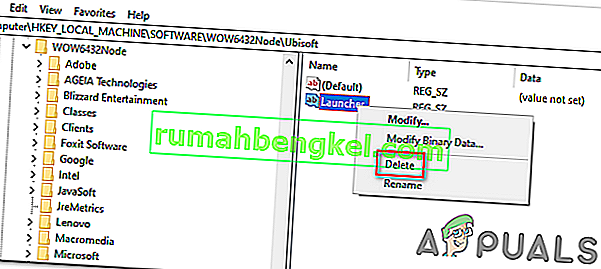
הערה: במקרה שתוכל למחוק את המפתח, כך תשתלט על מפתחות רישום.
הערה: לאחר שתמחק אותו, המשגר ייאלץ ליצור ערך מחרוזת משגר חדש עם נתונים טריים, שאמורים לפתור את הבעיה.
- לאחר מחיקת המפתח, סגור את עורך הרישום והפעל מחדש את המחשב.
- בעת אתחול המחשב הבא, חזור על הפעולה שגרמה בעבר לשגיאת " חריג win32 לא מטופל התרחשה " ובדוק אם הבעיה נפתרה.


במקרה שאותה בעיה נמשכת, עבור למטה לתיקון הפוטנציאלי הבא להלן.
פתרון 4: אפס את Internet Explorer (אם רלוונטי)
מופע פוטנציאלי נוסף עם פוטנציאל יצירת נושא זה הוא סדרה של Internet Explorer פגום (IE). אם אתה נתקל ב"חריג win32 לא מטופל התרחש ב- iexplore.exe " רוב הסיכויים שהוא מופיע לאחר סקריפט כושל.
כדי לפתור בעיה זו, עליך לאפס את הגדרות Internet Explorer באמצעות תפריט אפשרויות האינטרנט. פעולה זו אושרה כמוצלחת על ידי הרבה משתמשים שהתמודדו עם שגיאה זו.
להלן מדריך מהיר לאיפוס Internet Explorer על מנת לפתור את השגיאה " אירעה חריג win32 לא מטופל ":
- ודא ש- Internet Explorer, Edge או כל מופע משויך אחר כבוי ושלא פועל תהליך רקע.
- לחץ על מקש Windows + R כדי לפתוח תיבת דו-שיח הפעלה . בתוך תיבת הטקסט, הקלד 'inetcpl.cpl' ולחץ על Enter כדי לפתוח את תפריט אפשרויות האינטרנט .

הערה: אם UAC (בקרת חשבון משתמש) תתבקש , לחץ על כן כדי להעניק הרשאות ניהול.
- לאחר שתצליח להיכנס למסך מאפייני האינטרנט , בחר בכרטיסייה מתקדם מהתפריט האופקי בחלקו העליון. לאחר מכן עבור אל איפוס Internet Explorer להגדרות ולחץ על איפוס כפתור.
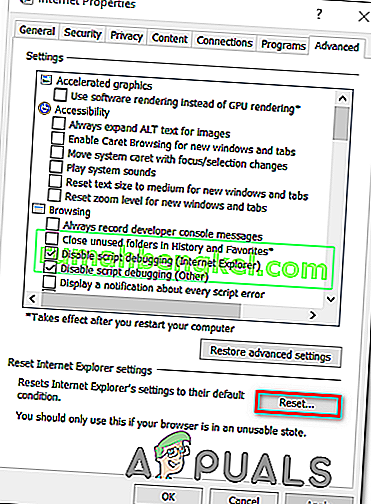
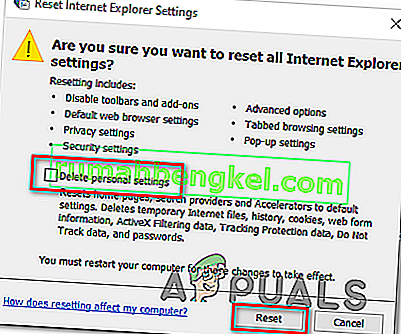
- ברגע שאתה רואה את מסך האישור, ודא שהתיבה המשויכת למחיקת הגדרות אישיות מסומנת, ואז לחץ על כפתור איפוס .
- המתן עד לסיום הפעולה, ואז הפעל מחדש את המכשיר ובדוק אם הבעיה נפתרה בהפעלה הבאה של המחשב.


במקרה שאותו "חריג win32 לא מטופל התרחש בשגיאה iexplore.exe" עדיין מתרחש, עבור למטה לשיטה הבאה למטה.
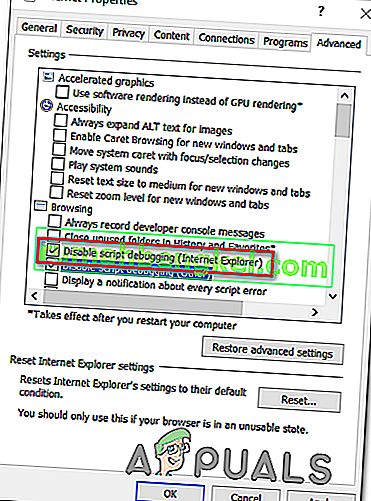
פתרון 5: השבת איתור באגים בסקריפטים ומפתחות רישום נלווים (אם רלוונטי)
אם אתה נתקל בבעיה עם Internet Explorer במחשב שמותקן עליו VS, הבעיה עלולה להתרחש גם כאשר ניפוי באגים בסקריפט מופעל ורישומי הרישום מכילים בסופו של דבר נתונים פגומים.
כמה משתמשים מושפעים שנתקלו בבעיה זו אישרו כי הבעיה נפתרה לאחר שהם נכנסו לתפריט אפשרויות האינטרנט כדי להשבית איתור באגים בסקריפטים ואז מחקו את המפתחות המשויכים באמצעות עורך הרישום.
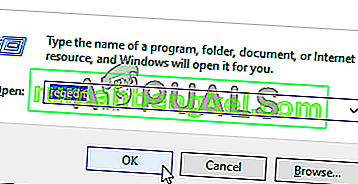
Here’s a quick guide on doing this in order to fix the “An unhandled win32 exception occurred in iexplorer.exe’ error:
- Press Windows key + R to open up a Run dialog box. Next, inside the text box, type ‘inetcpl.cpl’ and press Enter to open up the Internet Options menu. If you are prompted by the User Account Control (UAC), click Yes to grant administrative privileges.

- Once you manage to find yourself inside the Internet Properties screen, use the menu at the top to select the Advanced tab.
- Inside the Internet Properties screen, scroll down through the Settings menu and check the box associated with Disable script debugging (Internet Explorer).
- Once the modification is enforced, hit Apply to save the changes, then close the Internet Properties window.
- Press Windows key + R once again to open up another dialog box. This time, type ‘regedit’ and press Enter to open up Registry Editor. You will need to grant admin access, so click Yes when prompted by the User Account Control window.
- Inside the Registry Editor, navigate to the following location using the left-hand menu:
HKEY_LOCAL_MACHINE\SOFTWARE\Microsoft\Windows NT\CurrentVersion\AeDebug (32 - Bit Machine) HKEY_LOCAL_MACHINE\SOFTWARE\Wow6432Node\Microsoft\Windows NT\CurrentVersion\AeDebug (64 - Bit Machine)
Note: The location of the file we need to delete is different depending on the Windows version that you’re using. If you have a 32 – bit Windows version use the first location, else, use the second.
- Once you arrive to the correct location, move down to the right-section, right-click on Debugger and choose Delete from the context menu.
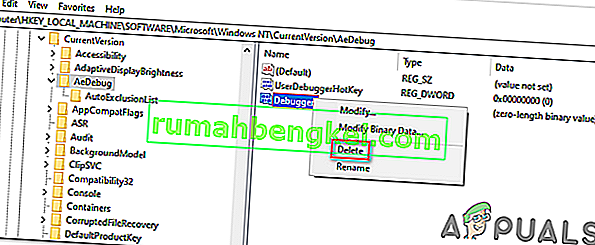
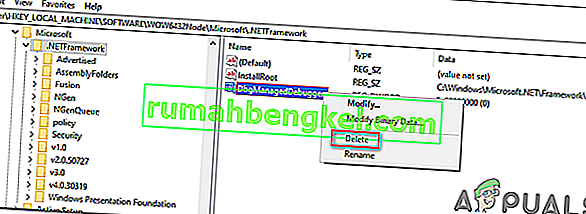
- Once this key is deleted, navigate to this second location:
HKEY_LOCAL_MACHINE\SOFTWARE\Microsoft\.NETFramework\ (32 - Bit Machine) HKEY_LOCAL_MACHINE\SOFTWARE\Wow6432Node\Microsoft\.NETFramework (64 - Bit Machine)
Note: Access the registry key associated with your Windows bit version that you’re using.
- When you arrive at the correct location, move over to the right-hand section and delete the DbgManagedDebugger value by right-clicking on it and choosing Delete from the context menu.
- After you manage to delete the value, close the Registry Editor and restart your computer.
- Once the next startup is complete, see if the same issue is still occurring.


In case the “An unhandled win32 exception occurred’ error is still occurring, move down to the next method below.
Solution 6: Install the Latest Version of NET Framework and Repair it
Having NET Framework installed on your computer is vital and plenty of modern games and programs depend on you having it installed. Before repairing it, follow the steps below in order to install the latest version on your computer.
Navigate to this link and click the red download button in order to download the latest version of the Microsoft .NET Framework. After the download has finished, locate the file you downloaded and run it. Note that you will need to have constant access to the Internet. Follow the instructions on-screen to proceed with the installation.
- After installing the latest version, it’s time to check its integrity. On your keyboard, use the Windows Key + R key combination to open the Run dialog box.
- Type in control.exe and click OK in order to open it.

- Click the Uninstall a Program option and click Turn Windows features on or off. Make sure you locate the .NET Framework 4.x.x entry and make sure it’s enabled. ‘x.x’ marks the latest version available for your operating system.
- If the checkbox next to .NET Framework 4.x.x is not enabled, enable it by clicking the box. Click OK to close the Windows Feature window and reboot the computer.

- If .Net Framework 4.x.x is already enabled, you can repair .Net Framework by clearing the box and rebooting the computer. After the computer has restarted, re-enable .Net Framework and restart the computer again.
Solution 7: Perform a Clean Boot
There are various other programs and services which can affect the proper functionality of the Microsoft .NET Framework suite. In most cases, the cause is the antivirus you have installed and you can try disabling it to see if the error persists. However, to make sure nothing can interfere with the installation, we recommend you perform a clean boot which will disable all non-Microsoft programs and services from starting up. This way, you can easily deduct just which program causes this error to happen!
- Use the Windows + R key combination on your keyboard. In the Run dialog box type MSCONFIG and click OK.
- Click on the Boot tab and uncheck the Safe Boot option (if checked).

- Under the General tab in the same window, click to select the Selective startup option, and then click to clear the Load startup items check box to make sure it’s not checked.
- Under the Services tab, click to select the Hide all Microsoft services check box, and then click Disable all.

- On the Startup tab, click Open Task Manager. In the Task Manager window under the Startup tab, right click on each startup item which is enabled and select Disable.

- After this, you will need to perform some of the most boring processes and that is enabling the Startup items one by one and restarting your computer. After that, you need to check whether the problem appears again. You will need to repeat the same process even for the Services which you have disabled in Step 4.
- Once you locate the problematic startup item or service, you can undertake action in order to solve the problem. If it is a program, you can reinstall it or repair If it is a service, you can disable it, etc.
Solution 8: Use SFC to Scan for Memory Leaks
It has been reported that the Microsoft .NET Framework corruption is related to faulty system files. These problems are rooted deep inside the system files and the only way to try to resolve them is by running the System File Checker (SFC). It will scan your system files for errors and possible repair or replace them. Follow the steps below in order to do so!
- Search for “Command Prompt” by typing it either right in the Start menu or by pressing the search button right next to it. Right-click the first entry which will pop up as a search result and select the “Run as administrator” context menu entry.
- Additionally, you can also use the Windows Logo Key + R key combination in order to bring up the Run dialog box. Type in “cmd” in the dialog box which appears and use the Ctrl + Shift + Enter key combination for admin Command Prompt.

- Type in the following commands in the window and make sure you press Enter after typing each one. Wait for the “Operation completed successfully” message or something similar to know that the method worked.
sfc /scannow
- Try to restart your computer and check to see if the Unhandled Exception has Occurred in your Application error continues to appear on your computer.
Solution 9: Performing a Clean Install
If none of the methods presented below have managed to help you in resolving the issue, it’s very likely that you’re dealing with some kind of Windows inconsistency that cannot be resolved conventionally.
If this scenario is applicable, you should be able to fix the issue by resetting every component associated with your Windows installation. If you want to go this route, you have two ways forward. It all boils down to the procedure that you want to follow:
- להתקין תיקון (in-place תיקון) - הליך זה הוא הגישה הטובה ביותר כאשר אתה צריך לרענן כל רכיב OS, אבל חלק מהמשתמשים עשויים בסופו של דבר בהתחשב שזה קצת מייגע מדי לטעמם. זכור כי תצטרך אמצעי התקנה תואם על מנת לאכוף תיקון זה, אך היתרון העיקרי הוא שכל הנתונים האישיים שלך (כולל משחקים, יישומים ומדיה אישית) יישמרו גם אם לא תגבה את המחשב שלך. .
- התקנה נקייה - אם אתם מחפשים את הפיתרון הפשוט ביותר, זו הדרך ללכת. לא תזדקק לאמצעי התקנה כדי לאכוף אותו (הכל נעשה באמצעות ממשק המשתמש של Windows). אבל אלא אם כן אתה מגבה את הנתונים שלך מראש, היה מוכן לאובדן נתונים כולל.