Nord VPN הוא אחד השחקנים הוותיקים בעולם ה- VPN ויישום Windows שלו נחשב בין הטובים בעולם המחשבים. Nord VPN הוא מגוון מאוד אם מדברים עליו מבחינת פונקציונליות וגמישות. בנוסף לתמיכה בין פלטפורמות, יש לו גם שרתים שונים הממוקמים בארצות שונות לבחירתך.

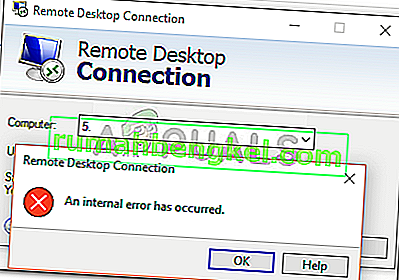
למרות היישום שהיה בשוק די הרבה זמן, משתמשים מדווחים שהם לא מסוגלים להתחבר ל- Nord VPN. זה או מפסיק להתחבר לאחר עדכון פוטנציאלי או שהבקשה לשרתי DNS או תחזיר תשובת 'זמן קצוב'.
מה גורם ל- Nord VPN לא להתחבר?
מכיוון ש- VPN עושה שימוש בכל ארכיטקטורת האינטרנט של מערכת מחשב, ישנן מספר סיבות לכך שה- VPN שלך Nord אינו יכול להתחבר כראוי. חלקם מפורטים להלן.
- IPv6: ככל הנראה Nord VPN אינו תומך בפרוטוקול IPv6 בשום תקשורת שלו. אז אם זה מופעל, ייתכן שלא תוכל להתחבר.
- תוכניות צד שלישי : ידוע שתוכניות צד שלישי מתנגשות עם מערכת התוכנה ומתחרות על משאבים; מכאן, גורם לכך שלא יתחבר כראוי.
- מתאם רשת: מכיוון שנורד משתמש במתאם רשת נפרד כדי לתקשר עם האינטרנט, יכול להיות שמתאם הרשת אינו פועל כראוי ועליך להפעיל אותו מחדש.
- שגיאה ברשת: לפעמים תצורות הרשת במחשב שלך עלולות להיות במצב שגיאה ולא לגרום לקישוריות בכלל. אנו יכולים לנסות לרענן את כל המשתנים במקרה זה.
לפני שנתחיל עם הפתרונות, עליכם לוודא שהאינטרנט שלכם עובד בפועל . אם האינטרנט שלך לא עובד כמו שצריך, נורד לא תוכל ליצור חיבור תקין ולתת לך גישה לרשת מנהרה.
וודא כי אתה משתמש ברשת פרטית (לא בבית ספר, בעבודה או במקומות ציבוריים כמו בתי חולים) ואין אנשי כוחות מעורבים. לאחר שבדקת פעמיים שהאינטרנט שלך עובד בסדר, המשך.
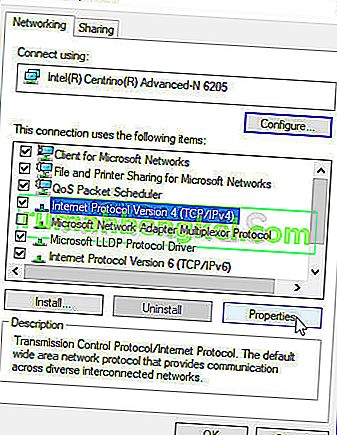
פתרון 1: השבתת IPv6
IPv6 (פרוטוקול גרסת אינטרנט 6) הוא הגרסה האחרונה של ה- IP בארכיטקטורת הרשת של מחשב. כברירת מחדל, אנו עדיין משתמשים ב- IPv4 ועדיין לא עברנו ל- IPv6 לצמיתות. עם זאת, יתכן שיש מכם שהתחילו להשתמש ב- IPv6 לקישוריות לאינטרנט. נראה כי IPv6 אינו פועל כהלכה עם Nord VPN. לפיכך נשבית אותו ונבדוק שוב.
- לחץ לחיצה ימנית על סמל הרשת שלך שנמצא בשורת המשימות ובחר פתח את הגדרות הרשת והאינטרנט . כעת לחץ על האפשרות שנה אפשרויות מתאם מההגדרות.

- לאחר הגדרות המתאם, לחץ לחיצה ימנית על המתאם בו אתה משתמש ובחר מאפיינים .
- לאחר נכסי המתאם, בטל את הסימון של אפשרות IPv6 וודא ש- IPv4 מופעלת. שמור שינויים וצא. כעת הפעל מחדש את המחשב ובדוק אם השגיאה נפתרה ואתה מסוגל להתחבר ל- Nord VPN.

פתרון 2: בדיקת יישומי צד שלישי
ישנם יישומים ותוכנות רבים אחרים שנראים מתנגשים עם Nord VPN בהפעלתו. אם יש יותר מיישום אחד שמנסה לגשת למשאב, יהיה מצב מירוץ והם לא יעבדו כצפוי.

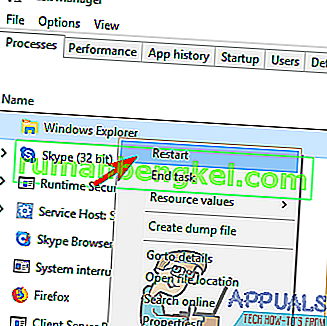
עליך להעלות את מנהל המשימות (Windows + R ו- 'taskmgr') ולבדוק את כל היישומים הפועלים ברקע. יישום כזה שהיה ידוע כגורם לבעיות היה Glasswire Elite . ודא שאתה מסיר את ההתקנה או מוודא שהוא מושבת כאשר אתה מנסה להתחבר עם Nord VPN.
הערה: אתה יכול גם לנסות לנקות אתחול המחשב שלך. פעולה זו תשבית את כל יישומי הצד השלישי החיצוניים ותפעיל רק את היישומים הדרושים. עכשיו אתה יכול לנסות ליצור חיבור. אם אתה מצליח, פירוש הדבר שהיה יישום כלשהו שגרם לבעיה. אתה יכול לעבוד בדרך חזרה על ידי הפעלת כל יישום ובדיקה שוב.
פתרון 3: שינוי מיקום השרת
Nord VPN נותן למשתמשים את האפשרות לבחור את מיקום השרת שלהם. שרתים אלה פזורים ברחבי העולם ונותנים קישוריות בהתאם למיקומם הגאוגרפי כלומר שרת קרוב יותר אליך צפוי להיות מהיר יותר. ננסה לשנות את מיקום השרת שאליו אתה מנסה לחבר ולראות אם זה פותר את הבעיה שאינה מתחברת.
- הפעל את Nord VPN ולחץ על כותרת השרתים שנמצאת בראש היישום.

- כעת בחר שרת אחר מבעבר ולאחר בחירתך, נסה להפעיל את ה- VPN שוב. אם אתה נתקל באותה התנהגות, נסה לבחור שרת אחר ולבדוק את הרשת באתר אחר.
פתרון 4: הפעלה מחדש של מתאם רשת / TAP
Nord VPN יוצר מתאם רשת וירטואלי במחשב בו הוא יכול להשתמש כדי להעביר מידע. זה מתנהג כמו גשר שבו Nord VPN משנה את ההגדרות כך שהוא יוכל ליזום ולתחזק חיבור VPN. לפעמים זה נכנס למצב שגיאה שגורם לך לא להתחבר לשרת ה- VPN שלך. אנו נפעיל מחדש את המתאם כראוי אשר יוודא כי כל התצורות שלו מופעלות מחדש.
- לחץ על Windows + R, הקלד " ncpa. cpl ”בתיבת הדו-שיח ולחץ על Enter.
- כל מתאמי הרשת יופיעו לפניך. בחר במתאם ה- TAP, לחץ עליו באמצעות לחצן העכבר הימני ובחר השבת .

- לאחר השבתתו, המתן לרגע. ואז לחץ עליו לחיצה ימנית שוב ובחר הפעל . עכשיו נסה לחבר את ה- VPN של Nord ובדוק אם זה עושה את הטריק.
פתרון 5: שטיפת רשת
יש אינספור דוגמאות לפיה שטיפה (רענון) של מחסנית הרשת במחשב שלך פותרת בעיות שונות הקשורות ל- VPN (כולל Nord). תהליך זה ישטוף את הגדרות ה- DNS וה- IP שלך וידאג שאין הגדרות לא נכונות שעשויות להיות מתנגשות עם היישום.
- לחץ על Windows + S, הקלד "שורת פקודה" בתיבת הדו-שיח, לחץ באמצעות לחצן העכבר הימני על היישום ובחר הפעל כמנהל .
- לאחר שורת פקודה מוגבהת, בצע את הפקודות הבאות אחת אחת ואחריה מקש Enter לאחר כל פקודה:
ipconfig / שחרר ipconfig / flushdns ipconfig / חידוש netsh winsock לאפס ממשק netsh ipv4 לאפס ממשק netsh ipv6 לאפס netsh winsock לאפס קטלוג netsh int ipv4 לאפס reset.log netsh int ipv6 לאפס reset.log

- כעת סגור את שורת הפקודה ונסה להפעיל שוב את Nord VPN. בדוק אם אתה יכול להתחבר אליו כראוי.
פתרון 6: התקנה מחדש של Nord VPN (יחד עם מתאם TAP)
אם כל השיטות שלעיל לא עובדות, עליך לוודא שהתקנת Nord שלך נכונה ואין שום דבר רע בקבצי ההתקנה. מתאם ה- TAP יותקן גם הוא מחדש בתהליך מכיוון שנורד VPN מנהל את המתאם והוא נועד רק לשימושו. וודא שאתה מחובר כמנהל. אם התקנה מחדש אינה פועלת, וודא כי האישורים שלך נכונים אשר נכנסת לשירותים לא פג.
- לחץ על Windows + R, הקלד "appwiz.cpl" בתיבת הדו-שיח ולחץ על Enter.
- ברגע שמנהל את היישומים, חפש את הערך Nord VPN מהרשימה, לחץ עליו לחיצה ימנית ובחר הסר התקנה .

- כעת הפעל מחדש את המחשב והורד את היישום שוב מהאתר הרשמי של Nord VPN. כעת לאחר הזנת האישורים שלך, נסה להתחבר שוב ובדוק אם באפשרותך ליצור את חיבור ה- VPN כהלכה.
פתרון 7: שימוש בשירות VPN חלופי
ישנם מספר רב של לקוחות VPN שם בחלונות. עם זאת, אנו ממליצים או לקוראים לנסות את CyberGhost. שירות VPN זה פשוט ככל שהוא מקבל ומספק לך גם שרתים הממוקמים בארצות שונות. יש לו אפילו שרתי VPN נפרדים להזרמת נטפליקס ו- BBC בקלות. בצע את השלבים הבאים כדי להוריד את היישום ולהבטיח את חיבורך תוך זמן קצר.
- Download CyberGhost from (here).

- After downloading the VPN, install it on your computer. You might be asked for proper permissions. Make sure that you are logged in as an administrator and press Yes to all the permissions asked.
- After CyberGhost is installed on your computer, launch it. Here you will see a list of different servers available along with the distance from your actual location (more distance means slower internet).

- After selecting the server, click on the power button present at the right-hand side of the application. You can also select dedicated servers for torrenting and streaming (present at the left navigation pane).
Solution 8: Disable Firewall
In some cases, the default Windows Firewall might be preventing the application from working properly. Therefore, in this step, we will first be allowing it through the Firewall and make sure that it isn’t blocked by the Firewall and then we will also make sure that Windows Defender has it added as an exception. For that:
- Press “Windows” + “R” to launch the Run prompt.
- Type in “ControlPanel” and press “Enter” to launch the classical control panel interface.

- Click on the “View by:” button, select “Large Icons” and then click on the Windows Defender Firewall option.
- Select the “Allow an app orfeature through the Firewall” button on the left pane and then click on the “Change Settings” button and accept the prompt.
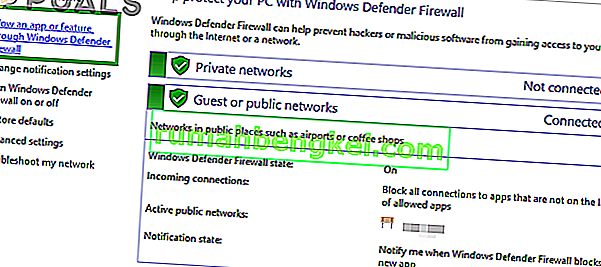
- From here, make sure that you check both the “Public” and the “Private” options for Nord VPN and its related applications/drivers.
- Save your changes and exit out of the window.
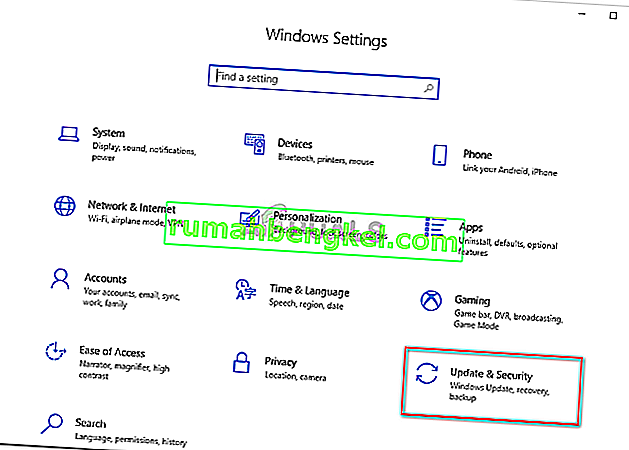
- After that, press “Windows” + “I” to launch the settings and click on the “Updateand Security” option.
- From the left pane, click on the “Windows Security” button and then click on the “Virus and Threat Protection” button.
- Select the “Manage Settings” button under the Virus and Threat Protection Settings heading.
- Scroll down and click on the “Add or Remove Exclusions” button in the next window.
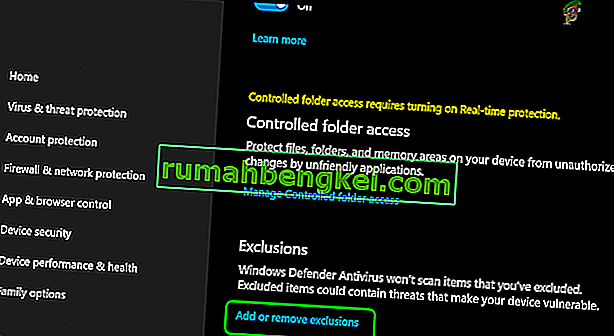
- Click on the “Add an Exclusion” option and select “Folder’ from the File type.
- Make sure to specify the Nord VPN folder and exit out of this window after saving your changes
- Check and see if doing so has fixed the issue with Nord VPN not connecting.


Solution 9: Change NordVPN Protocol
It is possible that Nord VPN might be running into issues while trying to connect to its servers due to the protocol configuration in its settings. If one type of protocol isn’t working for you, it is always recommended to try and switch to the other protocol to make sure that the issue isn’t tied to the wrong selection of the protocol type automatically or manually. For that:
- Launch NordVPN and make sure to disconnect from any currently active sessions.
- Click on the “Gear” icon on the top right corner and go into the settings.
- Click on the “Advanced” option from the left-hand side menu.
- Click on the “Protocol” dropdown and check on “TCP”.
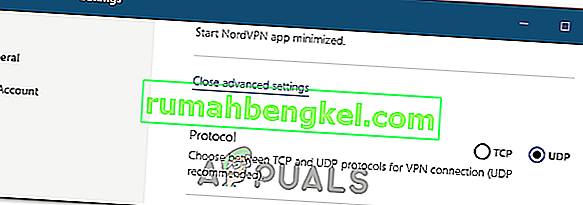
- This should change your protocol from TCP to UDP.
- Check to see if doing so fixes the issue for your computer.
- To Verify that none of the protocols work, make sure to repeat the steps and select “UDP” instead of TCP and then check again.
- If none of the selected protocols are able to make a connection with the server, move on to the other fixes.

Solution 10: Changing DNS Server Configuration
DNS Servers are used by the computer to establish a stable and secure internet connection with other sites on the internet, however, if the computer is unable to detect the DNS settings properly, or if the selected DNS server is facing outage, Nord VPN might not connect properly. Therefore, in this step, we will be changing the DNS configuration to ensure that DNS isn’t an issue. For that:
- Press “Windows” + “R” to launch the Run prompt.
- Type in “ncpa.cpl” and press “Enter” on the keyboard to launch the network configuration panel.

- Right-click on your internet connection and select the “Properties” option.
- Double click on the “Internet Protocol Version4 (TCP/IPV4)” option and check on the “Use the following DNS addresses” button.
- At first, type in “8.8.8.8” and “8.8.4.4” in the primary and the secondary DNS addresses field respectively and click on “OK”. After that, check to see if NordVPN is connecting, if it isn’t, try to use “103.86.96.100” and “103.86.99.100” in the primary and the secondary fields respectively.
- Check to see if you are able to make a connection by selecting those DNS servers.


Solution 11: Opening Ports
For some people, the issue might arise if the ports that NordVPN uses to communicate with its servers are being blocked by your router. For security reasons most routers often block ports used by VPN/Network Tools to prevent any alterations to your connections and if that is the case, we will have to open the ports by logging in to the router’s control panel. For that:
- Press “Windows” + “R” to launch the Run prompt and type in “cmd” and then press “Ctrl” + “Shift’ + “Enter” keys on your keyboard to provide admin permissions.

- Type in the following command in the command prompt to list the IP information.
ipconfig /all
- The computer will list all the information of the network adapters connected to your computer.
- Under the default gateway option, after the mac address, there should be an IP address that should look something like “192.168.x.x”.
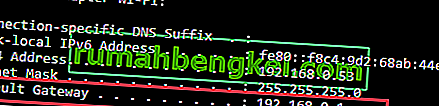
- Copy this IP address and launch your browser.
- Paste the IP address within a new tab on the browser and press “Enter” to navigate to the browser’s login page.
- Once on the login page, log into the control panel with your credentials, both of which, i.e the username and password should be written on the back of your internet router. If not, then the username should be admin and the password should be the Wifi password that you use to connect your devices.
- After logging into the Control panel, look around for a “NAT” or “Port” option that allows you to forward ports.
- Type in “500” and select “UDP” from the list.
- Click on “Save” to forward the 500 UDP port and exit out of the control panel after the change has been made.
- Try connecting with Nord VPN and check to see if the issue persists.


Solution 12: Use Hotspot
Mostly, this error can be fixed simply by employing your mobile’s hotspot connection instead of the Wifi or the Wired connection that you are already using on your computer. This does seem an inconvenience for Data conscious people but it seems to be the only way some people are able to connect through Nord VPN as some routers block it completely.
Note: In addition to this, you can try to change the firmware on your router to avoid any permanent blocks put from the router or to eliminate any bugs with the connection.