משתמשים בדרך כלל נתקלים בבעיה זו לאחר שניסו לעדכן את Windows 10 באמצעות Windows Update (WU). השגיאה 0x8024a105מסמן בעיה ברכיבי העדכונים האוטומטיים .בדרך כלל, לאחר עדכון נכשל המשתמשים יראו את ההודעה הבאה:
"היו בעיות בהורדת כמה עדכונים, אבל ננסה שוב מאוחר יותר. אם אתה ממשיך לראות זאת, נסה לחפש באינטרנט או ליצור קשר עם התמיכה לקבלת עזרה. קוד שגיאה זה עשוי לעזור: (0x8024a105). "

אם אתה נאבק כרגע בבעיה זו, הצלחנו לזהות כמה תיקונים קיימא שעזרו למשתמשים במצב דומה כמוך בהצלחה. אנא עקוב אחר כל אחת מהשיטות הבאות לפי הסדר עד שתיתקל בפתרון שמצליח לפתור את הבעיה שלך.
שיטה 1: הפעלת פותר הבעיות של Windows Update
נתחיל פשוט על ידי הפעלת פותר הבעיות של Windows Update . חלק מהמשתמשים הצליחו לאפשר לעדכונים לעבור על ידי מתן פותר הבעיות המובנה לתקן באופן אוטומטי את הרכיבים השבורים. להלן מדריך מהיר להפעלת פותר הבעיות של Windows Update :
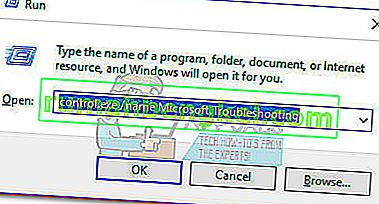
- לחץ על מקש Windows + R כדי לפתוח חלון הפעלה. הקלד או הדבק את הדברים הבאים.
control.exe / שם מיקרוסופט. פתרון תקלות
לחץ על Enter כדי לפתוח את פותר הבעיות המובנה.
- בשנות ה פתרון החלון, לחץ על העדכון של Windows , ולאחר מכן לחץ על הפעל את פותר הבעיות .
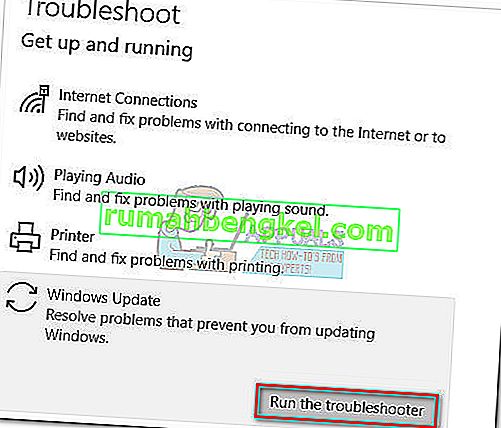
- המתן עד שפותר הבעיות יגלה בעיות בלקוח העדכון שלך. אם הוא מצליח לזהות בעיות כלשהן, עקוב אחר ההנחיות שעל המסך כדי להפעיל את התיקון האוטומטי. בדרך כלל, תצטרך רק לבחור ליישם תיקון זה .
- אם פותר הבעיות לעדכון מדווח שהוא הצליח לתקן משהו, הפעל מחדש את המחשב ובדוק אם הבעיה נפתרה בהפעלה הבאה.


אם העדכונים עדיין נכשלים עם שגיאת 0x8024a105 , עבור לשיטה 2.
שיטה 2: שנה הגדרות בקרת חשבון משתמש (UAC)
אם פותר הבעיות לא הצליח לתקן את הבעיה באופן אוטומטי, בוא נראה אם הבעיה לא נוצרה על ידי הגדרת בקרת חשבון משתמש . כפי שמתברר, כמה עדכונים נכשלו בשגיאת 0x8024a105 מכיוון שלחשבון המחובר אין את ההרשאות הדרושות. באפשרותך לתקן בעיה זו בקלות על ידי שינוי הרשאות חשבונות המשתמש הקשורים לחשבונך למנהל המערכת. להלן מדריך מהיר לעשות זאת:
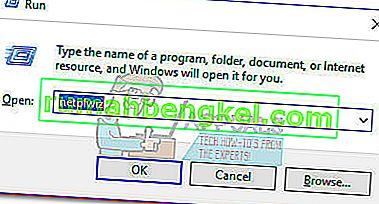
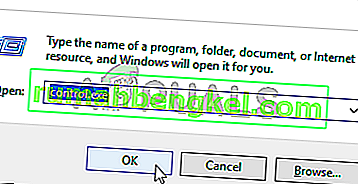
- לחץ על מקש Windows + R כדי לפתוח חלון הפעלה. הקלד או הדבק " netplwiz " ולחץ על Enter כדי לפתוח את פותר הבעיות המובנה.
- בשנות משתמשים הכרטיסייה, בחר את המשתמש שאתה משתמש ולחץ על מאפיינים.
- בשנות ה Properties החלון, ללכת חברות בקבוצות ולהגדיר את רמת הגישה אלי Administrator . לחץ על החל כדי לשמור את השינויים שלך.
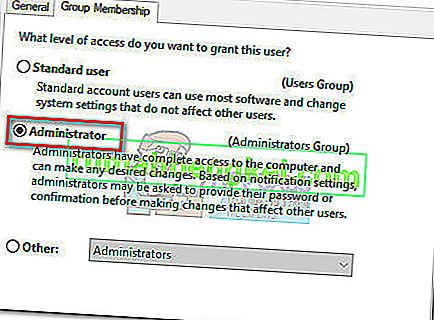 הערה: אם רמת הגישה כבר מוגדרת למנהל , עבור ישירות לשיטה 3 .
 - אתחל את המחשב וודא שאתה מתחבר עם אותו חשבון משתמש. לאחר סיום האתחול נסה לבצע את העדכונים שוב. אם אתה רואה שהם נכשלים עם השגיאה 0x8024a105 , עבור למטה לשיטה השלישית.

 הערה: אם רמת הגישה כבר מוגדרת למנהל , עבור ישירות לשיטה 3 .
שיטה 3: איפוס ידני של רכיבי Windows Updates
אם השיטות שלעיל הוכיחו כלא צלחו, אין לנו ברירה אלא לאפס ידנית את רכיבי עדכוני Windows ולאחר מכן להפעיל מחדש את תהליך Windows Update . מתוך ארבע השיטות המוצגות, זוהי סבירות גבוהה יותר להצלחה, אך דורשת התאמה רבה יותר.
להלן מדריך מהיר לאיפוס רכיבי Windows Updates:
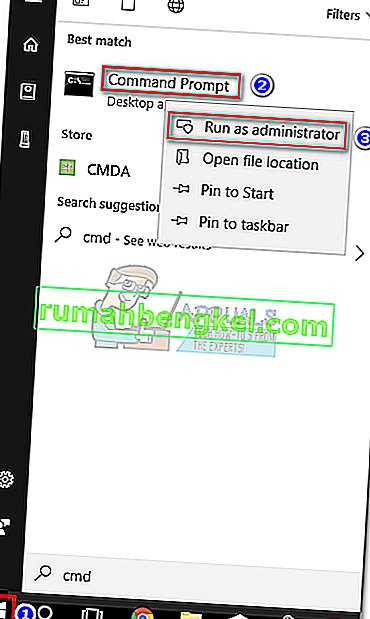
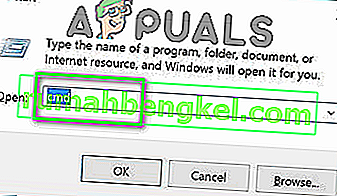
- לחץ על סרגל ההתחלה של Windows (בפינה השמאלית התחתונה) וחפש " cmd ". לאחר מכן, לחץ באמצעות לחצן העכבר הימני על שורת הפקודה ובחר הפעל כמנהל .
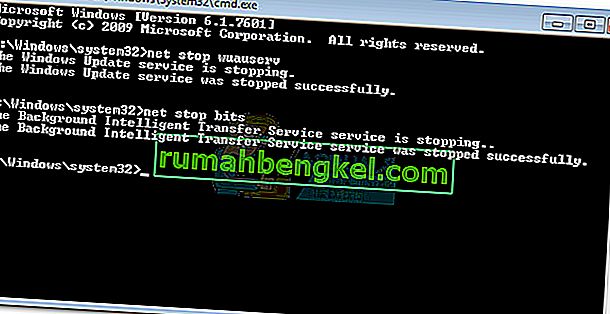
- ב שורת פקודה, אנחנו הולכים לעצור את שירותיו של מתקין MSI, Windows Update, BITS, ו הצפנה . לשם כך, הכנס את הפקודות הבאות ולחץ על Enter אחרי כל אחת מהן:
עצור רשת. עצור רשת עצירה נטו cryptSvc ביטים נטו עצור
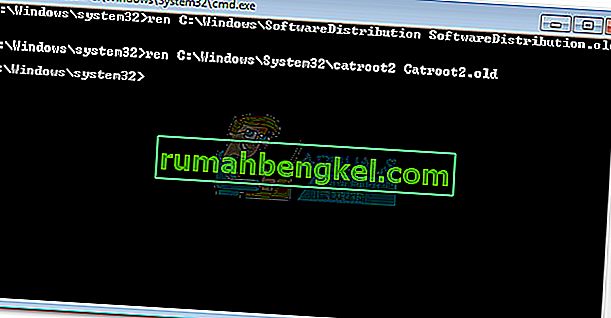
- לאחר הפסקת כל השירותים, בואו לשנות את שם תיקיית SoftwareDistribution ותיקיית Catroot2 על מנת לאלץ את Windows Update להפעיל מחדש את רכיביה. הדבק או הקלד את שתי הפקודות בשורת הפקודה המוגבהת ולחץ על Enter אחרי כל אחת מהן:
ren C: \ Windows \ SoftwareDistribution SoftwareDistribution.old
ren C: \ Windows \ System32 \ catroot2 Catroot2.old
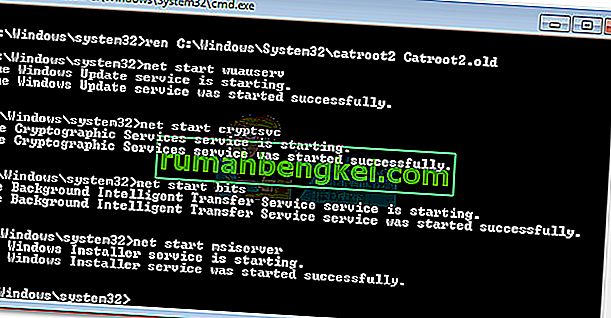
- לאחר שמם שונה של שתי התיקיות, הגיע הזמן להפעיל מחדש את שירותי MSI Installer, BITS, Cryptographic ו- Windows Update. לשם כך, הקלד את הפקודה הבאה בשורת הפקודה ולחץ על Enter אחרי כל פקודה:
התחל נטו wuauserv נטו התחל cryptSvc ביטים התחל נטו התחל נטו
- לאחר שהשירותים הופעלו מחדש, סגור את שורת הפקודה המוגבהת והפעל מחדש את המחשב שלך.


שיטה 4: מחק את תיקיית הפצת התוכנה
במקרים מסוימים ניתן לתקן את הבעיה פשוט על ידי מחיקת תיקיה באמצעות Powershell. לכן, בשלב זה, ראשית, נפעיל את PowerShell כמנהל מערכת ואז נמחק את תיקיית הפצת התוכנה בכדי להתחיל את תהליך העדכון. בשביל זה:
- לחץ בו זמנית על כפתורי "Windows" + "X" ובחר באפשרות "מעטפת כוח (מנהל מערכת)" .
- הקלד את הפקודה הבאה ולחץ על "Enter" כדי לבצע אותה.
עצור נטו
- שוב, הקלד את הפקודה הבאה ולחץ על "Enter".
ביטי עצירה נטו
- לבסוף, נווט לתיקייה הבאה.
C: \ Windows \ SoftwareDistribution
- לחץ על "Ctrl" + "A" כדי לבחור את כל תוכן התיקיה ולחץ על "Shift" + "Del" כדי למחוק אותם לצמיתות.
- אשר כל הנחיה המזהירה אותך מפני מחיקת קבצים אלה ולאחר מכן אתחל מחדש את המחשב כדי להשלים את התהליך.
- עכשיו, מנסה עדכון ו לבדוק כדי לראות אם נמשך הנושא.

לאחר שהמחשב שלך יאתחל, בדוק אם אתה מסוגל להתקין את העדכונים ללא השגיאה 0x8024a105 . אם כן, נסה לבצע סריקת SFC כדי לפתור בעיות עם קבצים או מנהלי התקנים חסרים.
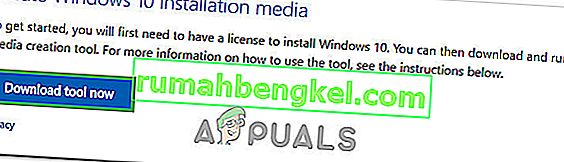
שיטה 5: עדכן באמצעות כלי יצירת המדיה
במקרים מסוימים, ייתכן שלא תוכל לעדכן את המחשב באמצעות תהליך ברירת המחדל של Windows Update מכיוון ש- Windows שלך לא יוכל ליצור קשר תקין עם שרתי העדכון. לכן, בשלב זה, נפרוס את כלי יצירת המדיה של Windows בכדי לבצע את העדכון עבורנו. זה יוריד ותתקין אוטומטית את קבצי העדכון כדי לשדרג את Windows שלנו. בשביל זה:
- הורד מכלי את כלי יצירת המדיה של Windows.
- הפעל את ההפעלה ובצע את ההוראות שעל המסך להגדרה הראשונית.
- לאחר ההתקנה הראשונית, בחר באפשרות "שדרג מחשב זה" ולחץ על "הבא".
- קבל את תנאי הרישיון ותן למתקין לרוץ.
- הכלי תופס כעת אוטומטית את קבצי העדכון מהשרתים ולעדכן את המחשב שלך לגרסה האחרונה הזמינה.
- בדוק אם פעולה זו תוקנה את השגיאה.

שיטה 6: מחק תיקיות הורדה
כאשר מורידים עדכון חדש, הוא מאוחסן בדרך כלל בתיקיות מסוימות במחשב. בשלב זה אנו מוחקים חלק מהתיקיות הללו ואשר יבקשו ממערכת ההפעלה להמשיך ולהוריד קבצים חדשים אשר לעיתים יכולים לנקות את השגיאה והעדכון יוחל כרגיל. בשביל זה:
- Press “Windows” + “R” to open the Run prompt.
- Type in “Control Panel” and press “Enter” to launch the classical control panel interface.
- In the Control Panel, click on the “View By:” option and select “Large Icons” from the list.
- Click on the “File Explorer Options” and a new window should pop up.
- In the File Explorer Options, click on the “View” button and then double click on the “Files and Folders” button to expand it.
- After that, double click on the ‘Hidden Files and Folders” to expand it as well.
- Check the “Show hidden Files, Folders and Drives” option and click on “Apply” to save your changes.
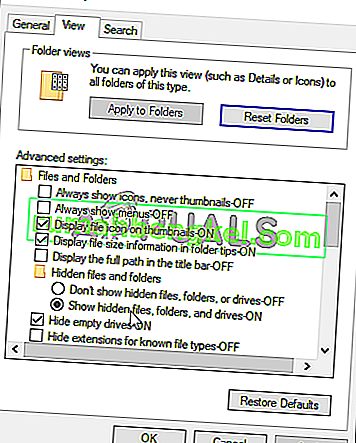
- Click on “OK” to close out of the window and press “Windows’ + “E” to launch the file explorer.
- In the File Explorer, delete the “$Windows.~WS” and “$Windows. ~BT” folders.
- Make sure to clear out the recycle bin as well so that they cannot be recovered.
- After this, press “Windows’ + “I” to launch settings and click on the “Update and Security” option.
- In Update and Security, click on the “Windows Update” option on the left pane and then click on the “Check for Updates” button.
- Updates will now automatically be downloaded and installed.
- Check to see if the issue persists.


Method 7: Resetting Catroot2 Folder
In some cases, it is possible that the Catroot2 folder and its files have either been corrupted or they have been misconfigured due to which this issue is being triggered. Therefore, in this step, we will first be making some changes from the command prompt and then we will delete the files inside that folder. For that:
- Press “Windows’ + “R” to launch the run prompt.
- Type in “cmd” and then press “Shift” + “Ctrl” + “Enter” to provide administrative privileges.
- Type in the following command and press “Enter” to execute it.
net stop cryptsvc
- After you have stopped the cryptsvc using the command above, type in the following commands into the command prompt one by one and press “Enter” after each to execute them on your computer.
md %systemroot%system32catroot2.old xcopy %systemroot%system32catroot2 %systemroot%system32catroot2.old /s
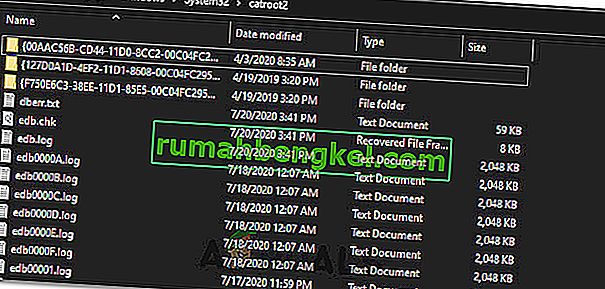
- After executing the commands stated above, we will be deleting all the files from the catroot folder without deleting the folder itself.
- Press “Windows’ + “R” to open the Run prompt and type in the following address to navigate to the catroot folder.
C:/Windows/System32/catroot2
- Press “Ctrl” + “A” once inside the folder to select all items inside it and press “Shift” + “Delete” to remove them from your computer.
- After removing these, confirm any prompts that might spring up on your screen.
- After that, open the command prompt back up and execute the following command.
net start cryptsvc
- Try to update your computer and check to see if the issue still persists.


Method 8: Configuring Services to Start Automatically
Sometimes, your computer might be preventing certain services from starting and functioning in the background due to which the update might not be properly installed or configured to be applied on your computer. Therefore, in this step, we will be setting up some services to startup automatically. For that:
- Press “Windows’ + “R” to launch the Run prompt.
- Type in “cmd” and press “Ctrl” + “Shift” + “Enter” to provide admin permissions.

- Type in the following commands one by one in the command prompt and press “Enter” after each to execute them.
SC Config wuauserv start=auto SC Config bits start=auto SC Config cryptsvc start=auto SC Config trustedinstaller start=auto
- This way, we will have configured these services to startup and run automatically in the background.
- Check to see if the issue persists.

Method 9: Re-register Windows Update and BITS Files
It is possible that some windows update files and Bits files might not be properly registered on your computer. Therefore, in this step, we will be re-registering these files on the computer and then we will check to see if that fixes our issue. For that:
- Press “Windows’ + “R’ to open the Run prompt.
- Type in “cmd” and then press the “Ctrl” + “Shift” + “Enter” buttons to provide admin permissions.
Type in the following commands one by one and press “Enter” after each to register the components.regsvr32.exe atl.dll regsvr32.exe urlmon.dll regsvr32.exe mshtml.dll regsvr32.exe shdocvw.dll regsvr32.exe browseui.dll regsvr32.exe jscript.dll regsvr32.exe vbscript.dll regsvr32.exe scrrun.dll regsvr32.exe msxml.dll regsvr32.exe msxml3.dll regsvr32.exe msxml6.dll regsvr32.exe actxprxy.dll regsvr32.exe softpub.dll regsvr32.exe wintrust.dll regsvr32.exe dssenh.dll regsvr32.exe rsaenh.dll regsvr32.exe gpkcsp.dll regsvr32.exe sccbase.dll regsvr32.exe slbcsp.dll regsvr32.exe cryptdlg.dll regsvr32.exe oleaut32.dll regsvr32.exe ole32.dll regsvr32.exe shell32.dll regsvr32.exe initpki.dll regsvr32.exe wuapi.dll regsvr32.exe wuaueng.dll regsvr32.exe wuaueng1.dll regsvr32.exe wucltui.dll regsvr32.exe wups.dll regsvr32.exe wups2.dll regsvr32.exe wuweb.dll regsvr32.exe qmgr.dll regsvr32.exe qmgrprxy.dll regsvr32.exe wucltux.dll regsvr32.exe muweb.dll regsvr32.exe wuwebv.dll
- After executing the commands listed above, check to see if the issue still persists.

Note: After trying the following fixes, if the issue still persists, try to perform a clean boot and check if that fixes it. If it does, update in the clean boot and then get out of it after the update is completed. If that doesn’t work, try to go for a clean install of Windows.